Akuawofoy

Protecting Your Information Against Cybercriminals During your Immigration Process

The immigration process can be a life-changing journey, but it’s important to navigate it with caution, especially in the digital age. Cybercriminals are constantly seeking opportunities to exploit sensitive information for illicit purposes. Protecting your personal data during the immigration process is paramount to ensure the safety of your identity and privacy. This article aims to provide you with valuable tips to safeguard your information and mitigate the risk of falling victim to cybercriminals.

  1. Be cautious with online communication:

During the immigration process, you may need to interact with Kentucky Consular Center and/or U.S. Embassy at your local jurisdiction. Exercise caution when sharing personal information via email, messaging apps, or online forms. Verify the authenticity of the recipient’s email address or website before sharing any sensitive details. Use secure communication channels whenever possible, such as encrypted messaging apps or secure online portals provided by official immigration entities.

  1. Strengthen your passwords:

Create strong, unique passwords for all your online accounts related to immigration matters. A strong password should be lengthy, combining uppercase and lowercase letters, numbers, and special characters. Avoid using easily guessable information like your birthdate or family members’ names. Implementing a password manager can help generate and securely store complex passwords for all your accounts. Kentucky Consular Center and sometimes your local U.S. Embassy might be communicating with you via email and it is important to ensure that your email account is secured by implementing a stronger password. 

  1. Beware of phishing attempts:

Cybercriminals often employ phishing techniques to trick individuals into revealing their personal information. Be cautious of suspicious emails, messages, or phone calls asking for your immigration details or login credentials. Avoid clicking on links or downloading attachments from unverified sources. When in doubt, contact the relevant immigration authorities directly through their official channels to verify the legitimacy of any requests. Inspect the sender’s email address to ensure that it comes from a trusted source.

  1. Secure your devices:

Ensure the security of your devices by keeping their operating systems, apps, and antivirus software up to date. Enable automatic updates to ensure you have the latest security patches. Use reputable antivirus software and perform regular scans to detect and remove any malware or malicious programs that may compromise your data.

  1. Guard against vishing attacks:

Vishing, or voice phishing, is a tactic used by cybercriminals to deceive individuals over the phone and extract sensitive information. Be cautious when receiving calls related to your immigration process. Never share personal details, such as your social security number or financial information, over the phone unless you initiated the call and are confident about the legitimacy of the recipient. 

Remember that legitimate organizations will never ask for sensitive information over an unsolicited phone call.

           Verify caller identity:

If you receive a call requesting sensitive information, always verify the caller’s identity before sharing any personal data. Ask for the caller’s full name, department, and a call-back number. Use official sources, such as the official website or contact details provided by the immigration authorities, to cross-verify the information you received. This helps ensure you are speaking with a genuine representative.

     6. Regularly monitor your accounts:

Stay vigilant and frequently monitor your immigration-related accounts for any suspicious activities. Regularly review your bank statements, credit reports, and transaction histories to identify any unauthorized or fraudulent transactions. Promptly report any discrepancies or suspicious activities to the relevant authorities.

Protecting your information during the immigration process is crucial in safeguarding your identity and privacy. By adopting proactive measures such as secure communication practices, strong passwords, and being cautious of phishing attempts, you can significantly reduce the risk of falling victim to cybercriminals. Additionally, maintaining device security, encrypting sensitive data, and monitoring your accounts help ensure a secure immigration journey. Stay informed, be vigilant, and take proactive steps to protect your information, allowing you to focus on your immigration goals with peace of mind.

Want to Study in USA??


Warning: Trying to access array offset on value of type bool in /home/wofobfwr/public_html/wp-content/plugins/elementor/includes/base/widget-base.php on line 223

Warning: Undefined array key -1 in /home/wofobfwr/public_html/wp-content/plugins/elementor/includes/base/controls-stack.php on line 695

Step 1

1. Have a journal to keep track of your journey and the information you acquire throughout this process.

2. First to find a school

3. Find a school that meets your needs and not the other way round.

 4. Use Google, Bing, yahoo to find schools

5. Or you can find schools through recommendations

6. Apply for admission

Step 2: After Admission Acceptance

Get admission Decision

Request for Certification of Eligibility of Nonimmigrant Status (F-1) for Academic or language studies or  M-1 status for vocational studies, Form I-20

Register in SEVIS & Pay your SEVIS fee

**Student & Exchange Visa Program (SEVIP)

Step 3 : Fill Visa Application & Get Interview Appointment

 Visa processing fee is paid in advance before the interview day. You will make the payment either in the local currency at the bank designated as the payment merchant in the country where you will be interviewing at. You can check your local U.S. embassy homepage for the current exchange rate.

  • Get Interview Appointment
Step 4 : Preparation for Interview

Preparing for interview can be both exciting and nerve-racking. In order to help you prepare for interview, there are some of the documentations you may need to gather for your D-day: 

  1. Passport : Valid and unexpired passport and with minimum 2 fresh pages.
  2. Confirmation page of the Nonimmigrant visa application form, DS-160 
  3. Certification of Eligibility of Nonimmigrant Status (F-1) for Academic or language studies or  M-1 status for vocational studies, Form I-20
  4.  Academic documentations such as : transcripts, admission letter, degrees/diplomas/certificates, proof of financial sustainability, and evidence to  show your intent to return after completion of your program.
Step 5: Interview Day

On your interview day, arrive early to avoid unnecessary. Bring your documentations and be prepared to prove your eligibility to the consular officer. You may not get a second chance so be ready to do your best.

Some questions to think about
  1. Why did you choose this particular school?
  2. What program will you study?
  3. How long will you stay?
  4. Where do you plan to live, -off campus or on campus or with friends/family?
  5. What are your academic goals or what you intend to do with this education?
  6. How will the education help you in your home country?
  7. How will education in the United States help your career goals?

Which Drug Abuse Can Make you inadmissible to the United States?

The United States has some of the strictest drug laws in the world, and those laws extend to foreign nationals who wish to enter the country.

Under Section 202 of the Controlled Substance Act, individuals who have engaged in drug abuse or drug trafficking may be deemed inadmissible to the United States.

Specifically, Section 202 lists a number of controlled substances that are illegal under federal law. These substances include marijuana, cocaine, heroin, and methamphetamine, among others. If an individual has used or possessed any of these substances, they may be denied entry to the United States.

But it’s not just recreational drug use that can cause problems. Section 202 also covers prescription drug abuse. If an individual has abused prescription drugs or has a history of addiction, they may also be deemed inadmissible.

Section 202 of the Controlled Substance Act has broken  them down into (IV) schedules: Schedule I, Schedule II, Schedule III, Schedule IV. Here are some of the drugs listed under each schedule:

Schedule I:

  • Heroin
  • LSD (Lysergic acid diethylamide)
  • Marijuana (cannabis)
  • Ecstasy (3,4-methylenedioxymethamphetamine or MDMA)
  • Methaqualone
  • Peyote

Schedule II:

  • Cocaine
  • Opium
  • Codeine
  • Fentanyl
  • Adderall (amphetamine)
  • Ritalin (methylphenidate)
  • Vicodin (hydrocodone)
  • OxyContin (oxycodone)

Schedule III:

  • Ketamine
  • Anabolic steroids
  • Testosterone

Schedule IV:

  • Xanax (alprazolam)
  • Valium (diazepam)
  • Ativan (lorazepam)
  • Klonopin (clonazepam)
  • Tramadol
  • Ambien (zolpidem)

The above is not a comprehensive list. Please refer to Sec 202 of Controlled Substances Act

How to Prepare for DV Lottery Interview as a Derivative

How to Prepare for DV Lottery Interview as a Derivative

A derivative is basically the eligible immediate family member who is deriving visa benefit for a principal applicant.

When it comes to DV Lottery, the derivative(s) does/do not influence the visa decision of the principal applicant. Meaning if the derivative fails to pass their interview for any reason, it will not impact the principal applicant’s visa unless in fraudulent cases.

{Now that we have clear this out of the way, let’s go to topic}

Basic Checklist

Interview Appointment letter; if you are not attending an interview with the Principal Applicant then you must have your interview appointment letter. This letter will be your means of entry to the embassy premises. But if you are attending interview together with the principal applicant, then one letter will suffice.

Confirmation page; this will be the DS260 confirmation page . It will contain the name of the derivative and the case number of the principal applicant.

Passport; valid and unexpired passport with minimum 6 months validity and minimum 2  used pages free.

Passport photo; (2) 2×2 inches or 5cm x 5cm color passport photo with your full name and DOB written on the back. DO NOT STAPLE

Birth Certificate; the original birth certificate and if you are unable to obtain it, please check the reciprocity page on the State Department’s website for your embassy’s procedure. 

Medical Exams; Typical, the medical exams results will be sent directly to the embassy  electronically. However, some U.S. embassies  still utilize hand delivered report by the visa applicant. So inquire from the medical facility if you might need to come back to pick up your results for interview day.

Police Clearance (s); if you meet the requirement for police clearance then make sure you have it or them. If you are unsure, please refer this video (insert video title)

Visa Fee; $330 per applicant. Derivatives are considered applicants at this stage and must also pay this fee. The fee must be paid in USD or local currency equivalent.

You may bring your educational certificates and work experience, but know that it will not be used in determining your visa eligibility since only the education or work experience of the principal applicant will be used in the visa approval determination.

If you are not attending this interview with the Principal Applicant, then you need to consider bringing relationship evidence and marital status evidence.

BUT if you are attending together, then there’s no need for you to also bring relationship evidence and marital status evidence.

If you have children then you have to go over this checklist for each derivative.

If you are derivative through who the eligibility is derived from, please WATCH my video on YouTube (WATCH THIS If Your DV Lottery Eligibility is Derived from Your Derivative)

New Opportunity to Teach in the UK

What Qualifications Do you Need to Teach in UK?

Qualified teacher status (QTS) is what you need to teach in most primary and secondary schools in England.

  • have an undergraduate degree of the same academic standard as a UK bachelor’s degree, 
  • have completed teacher training that meets the standard of a level 6 qualification 
  • be qualified to teach children aged between 5 and 16 years
  • have at least one school year 
  • have the professional status needed to be a teacher in the country where you qualified

So how can someone untrained  in UK qualify???

iQTS….what is it and how will that help me qualify?

iQTS stands for International Qualified Teacher Status! 

Beginning February 1, 2023, there is going to be an opportunity for those who reside outside of the UK to earn QTS to be able to teach in the UK.

There are six pilot providers approved to offer training:

Check out  >>Get iQTS for more information

Who can qualify??

Teachers with qualifications from:

  • Ghana
  • Hong Kong
  • India
  • Jamaica
  • Nigeria
  • Singapore
  • South Africa
  • Ukraine
  • Zimbabwe

IETLETS is not required from applicants whose educational instruction is done in English language

UK government plans on expanding the program to include all countries.

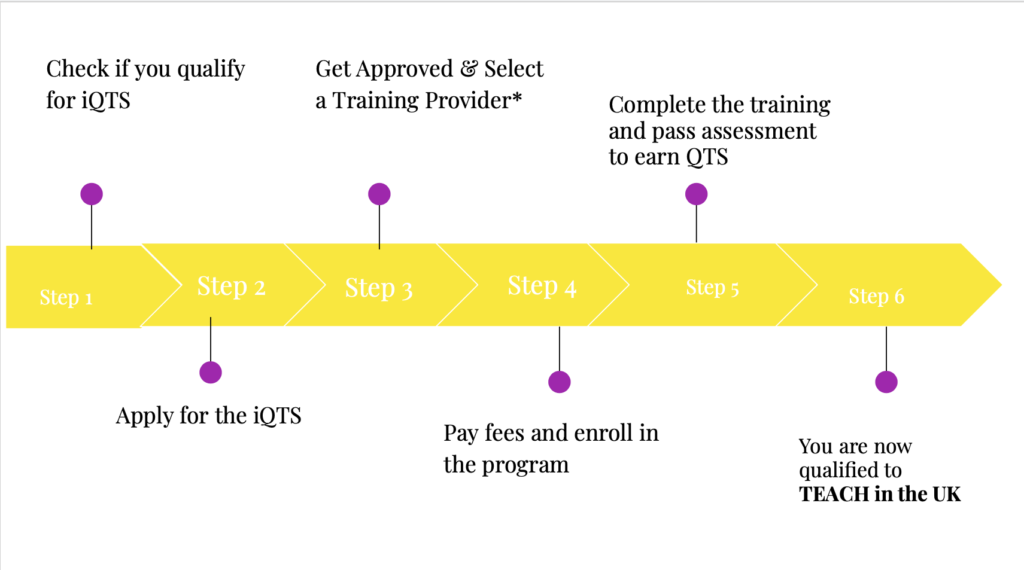
Process to become QTS ready

*Applicants will not have to travel to UK for their training. Rather, they would be able to training in partner schools and institutions in their countries or regions.

*Program fees starts from £9000

Apply for your teaching job and visa after QTS

You can apply for teaching jobs in England using a free, UK government-backed service.

You’ll also need a visa or immigration status allowing you to work in England. You can use this UK government tool to check if you need a visa.

You will usually need to find a job before you apply for a visa. Learn more about applying for the correct visa to teach in England.